I’m sure you know that a Domain Name System (DNS) is a hierarchical and decentralized naming system that lets you connect to the internet. However, if you don’t know, a DNS is a type of system that helps to convert human-readable domain names into IP addresses — addresses the internet recognizes.
That said, are you aware of the type of DNS server that you use to access the internet?
Are You Utilizing Your ISP’s Default DNS Server?
If you don’t have an answer to the question, it means you’re most likely using your Internet Service Provider’s (ISP’s) default server.
ISP’s default servers are okay in terms of speed — at least you can testify to that since that’s what you’ve been using for a while now. However, it’s worth knowing that the server lacks privacy features and isn’t even as fast at contacting domains to browse the web as you may have thought.
These are some of the reasons why you need to consider switching from your default server to the best public DNS server, such as Cloudflare DNS. But before you start switching, here’s a burning question; is it safe to change your DNS server and how exactly can you go about doing it?
Switching from your current DNS server to another one is very safe and will never harm your computer or device. However, ensure you are changing to a known and reliable server, such as Cloudflare or another third-party server that does not sell your data. To change your DNS server at a router level or computer level, enter the Networking settings and switch to the new DNS server numbers.
There are lots of reasons why you might want to switch from one server to another server. It might be because the DNS server isn’t offering you enough features that some of the best DNS public/private servers offer, such as privacy, parental controls, and high redundancy. In the rest of this post, we’ll be further looking at everything that you need to know about “switching your DNS server” and how to do it right.
Is It Safe To Change Your DNS Server?
Unless you’re switching to an unknown DNS server, then it’s very safe to change your DNS server. That said, the question is why are you interested in changing your DNS server, and which one are you switching to?
If you’re changing your DNS server because of poor performance and lack of great features, such as parental controls, security, and high speed, then you should be switching to a reliable and popular one. The truth is using your ISP’s default DNS server is okay but not very safe for you in terms of limiting your data that is being shared with your ISP or websites and the data they sell to advertisers.
That said, if you’re looking to change your DNS server safely, make sure you’re not switching to a bad or unsecured server. Well, the only way to avoid that is by opting for a reliable and popular DNS server, such as Cloudflare, Google DNS, or OpenDNS.
Should You Change Your DNS Server?
Here’s another question, is it important to change your DNS server? The answer is yes, especially if you’re making use of your ISP’s default DNS server. That said, let’s have a quick look, below, at some of the reasons why you need to switch to another reliable DNS server.
- High performance
One of the reasons why you should change your DNS is high performance. In case you don’t know, most ISPs out there are not very reliable in terms of browsing performance. Third-party DNS servers are mostly faster than them. That said, if you’re experiencing slow browsing speed, it’s high time you switched from your ISP’s default server to a high-performing one, which is closer to your location.
Another reason why you should change your DNS server is that your ISP can log your browsing history, to know which websites you visit. This is not a good thing if you’re looking to get everything, including privacy.
Certainly, many ISPs out there often claim they don’t log their customers browsing history. However, since they are the ones in charge of the servers, they can always log the browsing history to understand how you interact with your browser (valuable data). If you really value your privacy, then you might want to change your DNS server to a more reliable one.
- Parental controls
If you’re using a router to connect to the internet, there is a high chance that other devices, including those belonging to your kids, are also connected to it. The disadvantage of this, if you’re using your ISP’s default DNS server, is that your kids will be able to watch any type of content, which is not good. To prevent that, you’ll need to set up Web filtering, to restrict what the kids will have access to browse.
Most ISP servers don’t offer parental control features. However, if you’re very interested in the feature, the best way is to change your server to a reliable one that offers the feature, such as OpenDNS. With OpenDNS, you will be able to configure the parental control feature, just the way you want it.
Step By Step Guide On How To Change Your DNS Server
You need the address of the new server
For you to say you want to change your ISP’s default DNS server, it means you already have a good one in mind that you’re planning to switch to. However, in case you’re still having a hard time choosing the best DNS server, you need not worry too much, as we’ve got you covered.
Google Public DNS
The most common public DNS server that you can opt for if you don’t care much about privacy, is Google DNS. The server offers a host of amazing features, it’s free and doesn’t require you to open an account. But I don’t trust Google. If you do, to change to this server, here’s the IPv4 address you’ll be needing: 8.8.8.8 and 8.8.4.4.
Cloudflare DNS
Apart from Google DNS, you can also consider changing to Cloudflare, which is known for its top-rated content delivery network. The DNS server offers impressive performance and a top-notch privacy feature — they do not log your internet traffic. Here’s the primary and secondary IPv4 DNS address, if you’re planning to use Cloudflare: 1.1.1.1 and 1.0.0.1.
OpenDNS
You can also make use of OpenDNS if you’re considering switching from your ISP’s server to a new one. Some of its offerings include web filtering (optional) and blocking phishing sites. Change to OpenDNS by using these addresses: 208.67.222.222 and 208.67.220.220.
In case you’re interested in another backup server apart from the aforementioned ones, do your research and get the primary and secondary IPv4 addresses. Now that you have the addresses, it’s time to change your DNS server.
Change Your Browser’s DNS Server
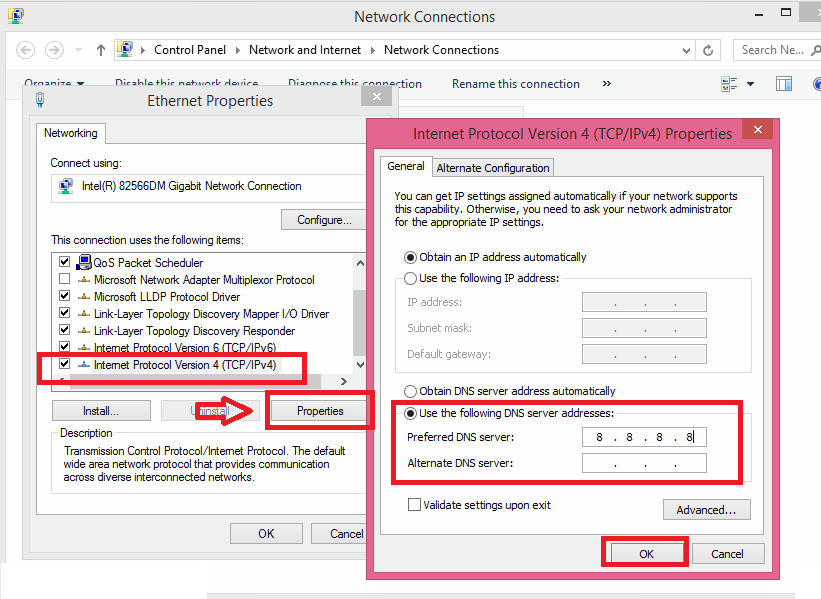
In Windows, Open up Control Panel -> Network and Internet -> Network Connections.

- Click on Internet Protocol Version 4 (TCP /IPv4) and then Properties.
- Select Use the following DNS server addresses and enter the new DNS address in the box below.
- Enter the primary DNS in the first box and the secondary DNS in the second box. Click OK.
If you want to use IPv6, Click on Internet Protocol Version 6 (TCP /IPv6) and then Properties. Find the IPv6 DNS servers and enter them as you did for IPv4. Some browsers are not yet able to use IPv6.
Go the Extra Mile and Change Your Router’s DNS Server
By changing your DNS settings at the router level, you can rest assured that all devices connected to your router will also route their traffic through your chosen DNS server and not your ISP’s.
- To begin the process, you’ll need to access your router’s web interface. In case you’re finding it hard to do that, you can use the router’s manual. If you don’t have one, startpage.com search your router’s model to gain access to the manual, or go here for a pretty good list of default router IP addresses for popular router brands.
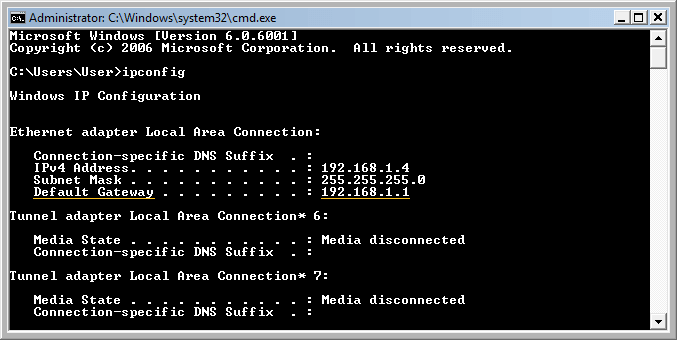
- In windows, you can find the IP address of the router by clicking Start on the task bar menu and typing CMD into the box
- Once you enter the CMD command, the command prompt having a black screen will open up.
- Enter the command ipconfig in the command prompt to display the default IP settings and configuration of the system, including the connected router.
- Look for the Default Gateway. Usually the default router IP address will look something like 192.168.1.1

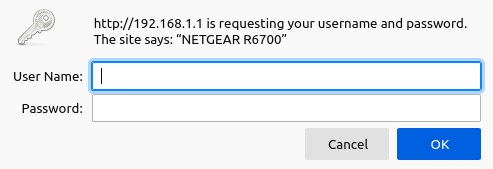
- Type your router’s IP address into the URL bar of a browser while you are connected to your network.
- Consult your router’s manual to determine your router login credentials, or find them here.

- After gaining access to the interface, check through the pages to find a DNS server option.
- Since you already have the primary server and secondary server addresses of the new public or private DNS, all you need to do is to input them in the appropriate boxes.
That’s all! You’ve now successfully changed your DNS server.