If you are traveling with a USB drive filled with sensitive data and you want to make sure nobody can access your medical files or other info stored on that drive without a password, what’s the easiest way to password protect a flash drive for free?
Depending on your operating system, there are a few ways to do this.
Using Bitlocker to Password-protect a Flash Drive in Windows 7/8/10
- Bitlocker is contained within Windows 7/8/10 and allows you to easily add a password to encrypt files on a USB drive.
- This is great way of protecting the contents of your USB stick; if you lose your drive or if someone accidentally plugs it in without authorization, they won’t have access to your device contents anyway.
How to use bitlocker to create a password-protected pendrive:
What: Bitlocker adds an encryption to your USB stick so that you can only open the contents of it if you provide a password.
- First plug your USB stick into your computer
- Next, right-click on the USB stick > click “turn on BitLocker” and it starts the application
- Provide a password for this particular USB stick. You will need to enter it every time you want to connect the USB stick to a new Windows computer
- Next, you have the option of saving a backup recovery key of that password to your Microsoft account or to a file. The backup is great because if you forget your password you can use a recovery key
- Turn on encryption to encrypt the drives
- Click Next and bitlocker begins encrypting the drive
- Finished! Remove the drive, then put the drive back in to confirm that Windows wants a password to access the drive
- Simply enter your password and you will see your files and folders again
That’s great, but what if you are using a version of Windows without Bitlocker, or you want to use something else?
How to remove the encryption made by bitlocker in Windows:
If you forget your password or lose your recovery key, there is a way to remove the encryption on your bitlocked USB.
- In Windows, go to the Start icon, type in PowerShell, then right-click on PowerShell and click on “Run as administrator”.

You will need to know the drive letter assigned to your USB — you can see which letter corresponds to your USB by typing in the first status command (below). Once you have the command line terminal open, type in the following commands:
PowerShell Commands For Removing Bitlocker Encryption From a Selected USB Drive
(*substitute your actual USB drive letter for the G in the example below*):
- manage-bde -status
- Disable-BitLocker -MountPoint “G:”
- manage-bde -off G:
Password-protect a USB drive on Windows without Bitlocker
Now that you have seen how easy it is to bypass Bitlocker’s encryption from the same Windows computer, you might rethink using it.
If you don’t want to use Windows’ built-in Bitlocker utility, you can download the open source application called VeraCrypt and install it on your USB stick. VeraCrypt is cross-platform (works with Linux, Mac, Windows).
Alternatives: learn step-by-step how to encrypt a flash drive without Bitlocker, for free.
How to Password-protect a Flash Drive using a Mac
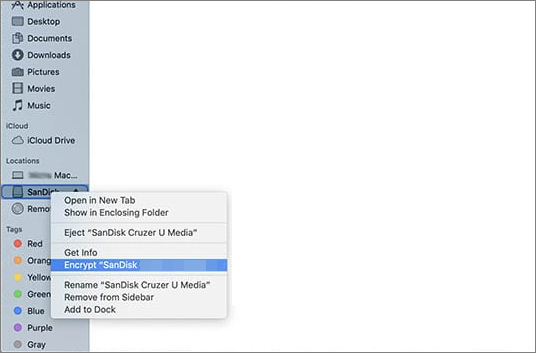
If you have a Mac you can use VeraCrypt (you must download it first), or use the included FileVault tool to encrypt a USB drive on Mac. Take the steps below.
Note:
- Windows cannot open drives encrypted with FileVault as the file format is not readable by Windows.
1. Connect the USB flash drive to your Mac.
2. Open Finder. Find and right-click the USB drive, then select “Encrypt” the USB drive.

3. Enter the password and confirm it. You can also add a hint to help remember the password later.
4. Select “Encrypt Disk” to complete the USB drive encryption process.
How to Password-protect a specific folder on a flash drive
Perhaps you don’t want to encrypt your entire USB drive, you just want to encrypt a single file and make it inaccessible to anyone who doesn’t have the passcode for it.
How to password protect a PDF, Excel file, or Word file for free? Best is to create a Veracrypt volume and encrypt your file that way, but if you are sending the file in an email to someone else who has the same software (i.e. you both use Microsoft Word), you could use the built-in encryption option for Word or you could add the files to a password-protected zip file.